Abbotsea Gardens - Christmas layout 2009
A build blog (last updated Sunday 6 December 2009) Jump to latest post on page
1) 10th November - initial thoughts for the 2009 Christmas layout
This layout idea has evolved from the Canute loco' build project that is described here. This first entry therefore is the cross referencing item and is a revised and edited copy of the corresponding day's entry about Canute to reflect adoption of the idea described.
Thoughts of a Christmas layout are coming to mind again but what theme should I pick this year for the setting? A couple of weeks ago I visited the Abbotsbury Sub Tropical Gardens autumn illuminations spectacular. The idea sparked thoughts about bending the seasons and creating a winter illuminations spectacular and spotting a colour changing LED fibre optic mini-Christmas tree in B&Q was probably the decoding moment. If adopted the name will be revised to Abbotsea, to give some scope for the very necessary artistic licence, as that was Thomas Hardy's name for the real village. An authentic touch from the genuine location without the necessity to slavishly copy and "rivet count" every detail of the prototype. The four thumbnails below link to larger size copies picked at random from the set taken on my visit to show a flavour of the Abbotsbury event.
2) 15th November - more stock

Back from yesterday's trip to Kidderminster where I bought four more of these little battery train sets from the Severn Valley Railway shop (three tank engines and one of the US outline tender engines. ) Disappointingly, although I had been advised that some Poundland stores had a slightly different version of these sets, their Kidderminster branch did not yield a supply. Now I have more sets the option for a guitar or cello body shaped track base roughly like an 8 (but not with a flat crossing) is now possible and of course inserting some home made straight track sections is also possible.
As far as choice of a setting is concerned The Abbotsea Gardens idea is gelling more and more with me but this has not yet been sketched out other than in my mind's eye. With more sets of track other quick Christmas pizza options are also possible. The key result of this is I have no excuses for not starting the Christmas 2009 layout based on one of these sets. The photo above, shows what you get in the basic set .
I learnt a big lesson with the 2008 Christmas project, namely that if the idea is too big, or the layout is physically too big, then time runs out as so many other time gobbling issues occur in the run up to the big day. So with Abbotsea Gardens it will be small and also with a design such that the basic item can be done quickly, with the extras added later as time permits. I also learnt from Pebbles End that subject to adequate bracing card is Ok as a base frame.
3) 3rd December 2009 (1) - building starts
This project has been gathering pace in the background whilst other activities have been progressing. A set of plain white Christmas lights and two sets of Christmas decoration trees have been bought, all from ASDA, ready to start the actual build. As it is promised to both SWMBO for Christmas, and more pressingly as to deadline, tentatively for a show on Saturday, two days away!!!! I finally forced time to start turning ideas into the final Christmas build into my schedule. After gathering tools etc., construction properly commenced about 12:00 hours.
Initial construction of the base board is cardboard based on the lid of a standard archive box plus extra cross bracing. Lessons learnt from our 2007 card challenge are hopefully being applied. - Nominal dimensions are 16 1/2" (417 mm) x 13 1/2" (341mm). The box is mainly glued up using neat PVA and with tabbed corners rather than but joints. However some of the joints could not be tabbed and these joints were hot glued.
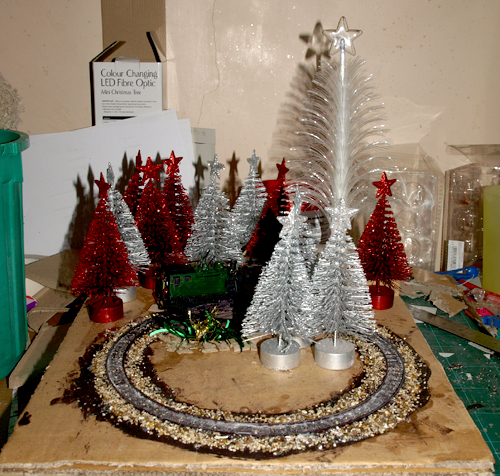
Scenically the layout will be a 12mm gauge pizza, using one of the cheapo battery toys as outlined earlier and some "bought in" Christmas decoration trees.
As photos help
below is a shot of the draft 1:1 working mock-up using "Canute's" test track and a bit of spare plywood. The test showed it needed a bit more "breathing space" outside the tracks.

4) 3rd December 2009 (2) - evening progress report
It is now ten hours into the build and I have got as far as I can go until the ballast dries so time for a reflective progress update. Unfortunately I don't think the ballasting has gone 100% to plan but we will see tomorrow am.
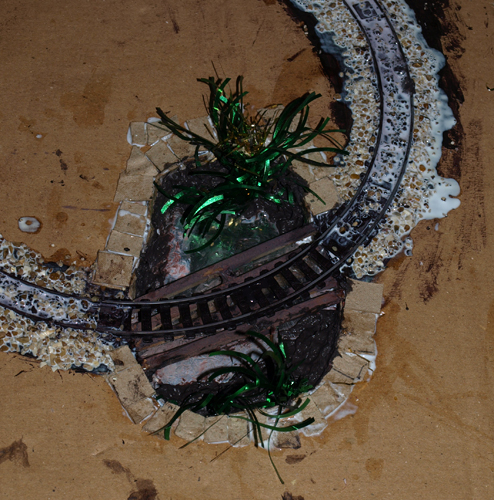
Step one - two full board layers of card overlaid onto the base deck with a roughly kidney shaped hole in them, to form a pond. Bako oven foil glued down with PVA for the pond bed as I hope the lights will reflect off it.
Step two - build the bridge. Fairly simple with two vertical struts and four way-beams. The timber used was a scrap rocket stick from 5th November that fell onto the drive. I know the end supports for the waybeams are omitted, lack of time to add that detailing.

Step three (photo not loaded) - Glue the circle of track down, I used double sided tape, then put a dirty dark brown colour onto the track and track formation.
Step four - ballast the track with the usual method of a 50/50 mix water:PVA with a dash of washing up liquid dribbled on via an eye dropper . Ballast material is budgie grit.

Final step for tonight - the pond weeds and mud. The mud is a mix of the last of the 50:50 PVA mix made up to do the ballasting, soft toilet tissue and some acrylic paints for colouring to a dark muddy brown all mixed to a paste. The pond plants are green and gold tinsel embedded into the glue mix (soil) and the pond has been edged using the egg-box technique. (In fact ASDA tomato trays)

Still to do -
a) add the trees
b) add the snow ground cover
c) add the back scene
d) add the flood lights as per Abbotsbury Gardens.
Hopefully (a) to (c) can be done tomorrow with (d) completed by Christmas.
5) 4th December 2009 - evening progress report = substantially complete
Although completed to a level where I can take it out to the Dorchester Model Railway Show tomorrow having me the first deadline target there is still lots of detailing to add. I also decided to confirm the name as Abbotsea Gardens using Thomas Hardy's name for Abbotsbury as with the layout having been built in Dorset it is relevant and the name is now out of copyright. So how did today go:-
The ballast did cause some problems when build resumed mid-morning today. However work with a blunt screwdriver shifted the errant lumps!
I got the trees hot-glued on before thinking about the snow paint effects. The layout of the trees you will also note has been amended since the draft shown above as I want to see the train running through the trees.

The loco crew decided to pull Canute out of the works to test the new bridge before the forecast snow turned up.

The snow then did arrive. For the record it is vinyl matt brilliant white Dulux mixed with Johnson's baby powder. The mix was done by trial an error until it could be whipped up to a creamy consistency then liberally applied with a 1/2" paint brush. Other areas dry brushed. Some glitter also sprinkled on whilst the paint wet. To do once the paint dry - spray the lot with hair spray to fix the loose glitter.
The 1:24 Santa arrived with the snow, he is a 3" tall Christmas cake decoration from the local Post Office, he is unbranded so I'm afraid I don't know the make.
So. subject to lots of final detailing between now and XMas day, the layout is substantially complete and will be going to the Dorchester Mod-ex tomorrow.

Back to top | Latest post follows -
6) 6th December 2009
Yesterday (Saturday) was the day of the show and everything had dried out overnight without any problems following the snow treatment of the day before. Given the layout still had some "un-fixed" glitter fortunately despite the early hour we remembered to do the hair spray sealing treatment before we loaded the car and spread glitter everywhere!!. The layout made it to Dorchester in one piece where it got some positive feedback.
One thing I have noted today however is some slight cracking in the snow layer which must be roughly along the edge line where I had painted the dirty coloured "track base" circle and then later had glued down the ballast surround to the track. This isn't a big issue but it is a lesson learnt for the future when doing speed building. I think the cause is either (a) that the card obviously needs a sealer or priming layer so that any finishing applied later in the build process can then dry evenly or (b) the final deep drying in this area has created some differential shrinkage.
As for things to still do to the layout; I think it needs a loading dock on the left hand side between Santa and the first trees. I also intend to add up-lighting under the trees towards the rear, some Christmas decorations/signs, edging/back scenes, some tinsel hedges / undergrowth between the trees and finally some wrapped presents under the big tree at the back. Lots of ideas but at least I have it sufficiently progressed that if time constraints mean nothing further gets done before this year's big day - it is acceptable as is.


